Contributing
First off, thank you for considering contributing to Gryphon. The project can always use the support of anybody who’s willing to help.
Contributions can take many forms: you can share the project with other developers, report bugs (we can’t fix what we don’t know about!), ask for new features, improve the tutorials, contribute some code, etc. The project aims to provide an open and inclusive space for everybody, which is why it abides to the contributor covenant and has a code of conduct.
- Getting in contact
- Reporting bugs and requesting features
- Improving the website and tutorials
- Contributing code
- How Gryphon works
Getting in contact
If at any point you need help using or contributing to Gryphon, or just want to contact the maintainers, feel free to send a message on Twitter or via email.
Reporting bugs and requesting features
Reporting bugs and requesting features are very important parts of contributing to any open source project. Many times, a bug hasn’t been fixed yet simply because the maintainers do not know it exists. Similarly, a feature may not have been added because the maintainers do not know anyone wants it. Gryphon uses GitHub issues to keep track of both bugs and feature requests. Anyone is welcome to open new issues, so long as they are respectful and follow the code of conduct. If you open a new issue, be sure to tag it with the bug label if it’s a bug report, or enhancement if it’s a feature request.
New GitHub issues should be created only for suggesting and discussing ways to improve Gryphon; if you have questions about using Gryphon or need some technical support, try sending a message on Twitter or via email instead.
If you find a problem that you think shouldn’t be public (for instance, a security issue that someone might exploit if they knew it existed), please do not open an issue; instead, send an email directly to the maintainers.
Improving the website and tutorials
This website is currently hosted using GitHub pages, so its texts and its code are open for anyone who wants to improve them. If you’d like to report a problem, try sending a message or opening an issue on GitHub.
If you’d like to improve things yourself, feel free to open a pull request - the website is in the gh-pages branch, and it’s made using Jekyll. If you don’t yet know what a pull request is, keep reading.
Contributing code
Contributions to the project’s website and its code are very much encouraged. Gryphon is a large program that takes a lot of work to maintain and improve, and help is always appreciated.
If this is your first time contributing to an open source project (or contributing to Gryphon), then welcome! Here are a few tips to get you started:
- Gryphon accepts code contributions in the form of a pull request. Try reading this tutorial or this one to learn more about how pull requests work and how to create your own. Once you do, come back and read the rest of this document to learn how to set up Gryphon’s development environment on your computer.
- If don’t yet know what kind of improvement you want to make, look for issues labeled first timers only. These issues are easier than most, and there will be a maintainer willing to hold your hand to help you get to your first accepted pull request on an open source project. If there aren’t any of these open, you can send a message asking for one. If you’re feeling confident, you can also try out good first issues, which are meant for people who have contributed to other projects but are new to Gryphon.
- Remember that everyone was a beginner at first! There’s no shame in asking for help.
If you would like to contribute a pull request that isn’t yet related to an existing issue, start by creating an issue of your own. It’s a good way to talk about your proposed changes and get advice before you start doing the work, and may avoid your pull request being rejected if your changes don’t align with the project’s direction.
When interacting with the maintainers on GitHub, you can usually expect a response within a couple of days. If you haven’t heard anything after a week, feel free to ping the thread.
Gryphon currently uses the release branch as its (reasonably) stable branch. This what users will access when installing Gryphon for the first time. Day-to-day development is done on the development branch, which is also where pull requests should be made. The development branch is merged onto release regularly, on a sort-of-weekly basis, resulting in sort-of-weekly updates for the users. The gh-pages branch contains the code for this website. Any other branches are works-in-progress that will eventually merge into one of these three main branches.
Using GitPod
If you want a quick start to the project, Gryphon supports using GitPod for development. GitPod is a platform that offers an online IDE and terminal that helps users contribute to open source projects. The GitPod build is based on the project’s Dockerfile, so any instructions for using Docker in the tutorials should also work in GitPod. You can access a GitPod workspace setup for using Gryphon with this link.
Setting up the environment on macOS
Start by cloning the repository, either directly or through a fork you own (if you don’t know what a fork is, read one of the tutorials on making a pull request, like this one or this one). Remember to use the development branch if you want to change code and the gh-pages branch if you want to change the website.
$ git clone https://github.com/vinivendra/Gryphon.git --branch development
$ cd Gryphon
Gryphon is set up as a Swift package, so you can start looking at the code right away by creating an Xcode project:
$ swift package generate-xcodeproj
$ open Gryphon.xcodeproj
Once the Xcode project is open, start by setting it to run in the current directory:
- Hit ⌘+⇧+, to open the scheme editor;
- Select
Runon the left-hand side, thenOptionson the top; - Scroll down to
Working Directoryand checkUse custom working directory; - Set it to
$SRCROOT, which is the Xcode project’s directory.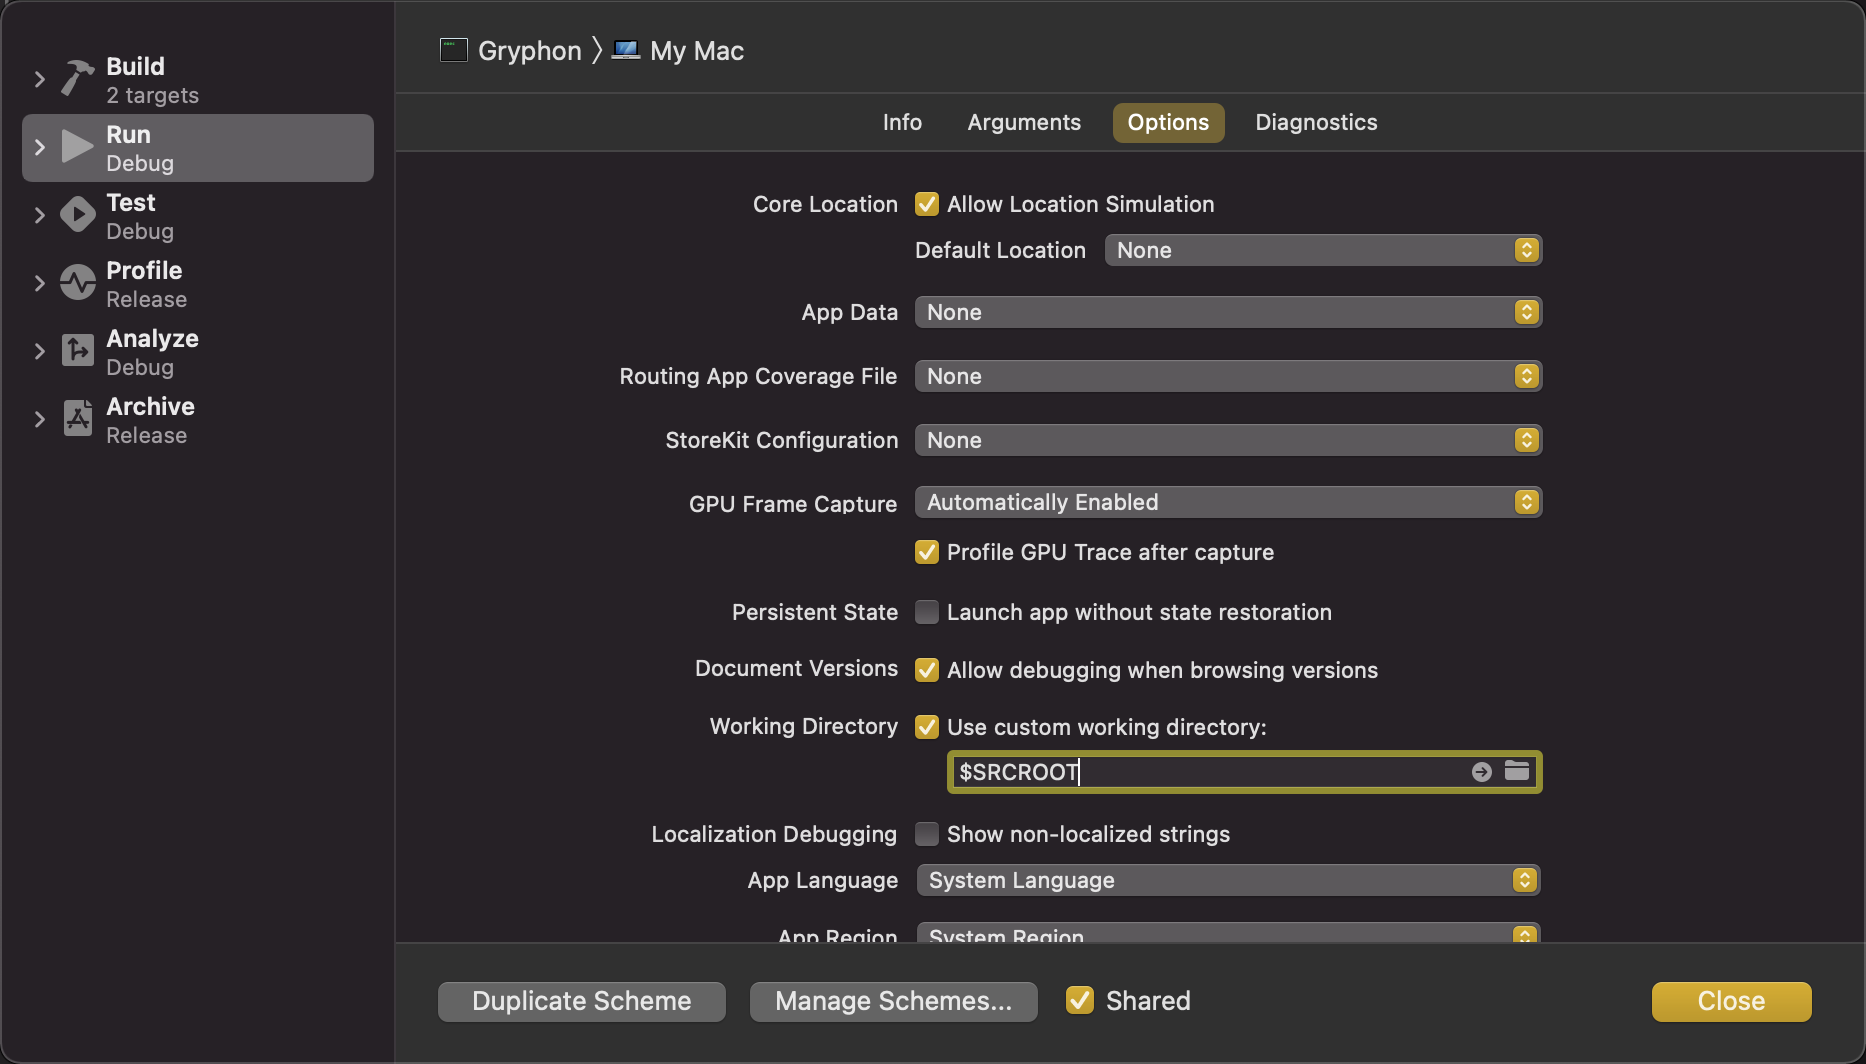
Next, set a few arguments to use with the Gryphon executable:
- Select
Argumentson the top; - Add
Test\ files/test.swiftand--write-to-console - You might also want to add
-emit-swiftAST -emit-rawAST -emit-AST -emit-kotlinto print the intermediate representations, which can help when debugging.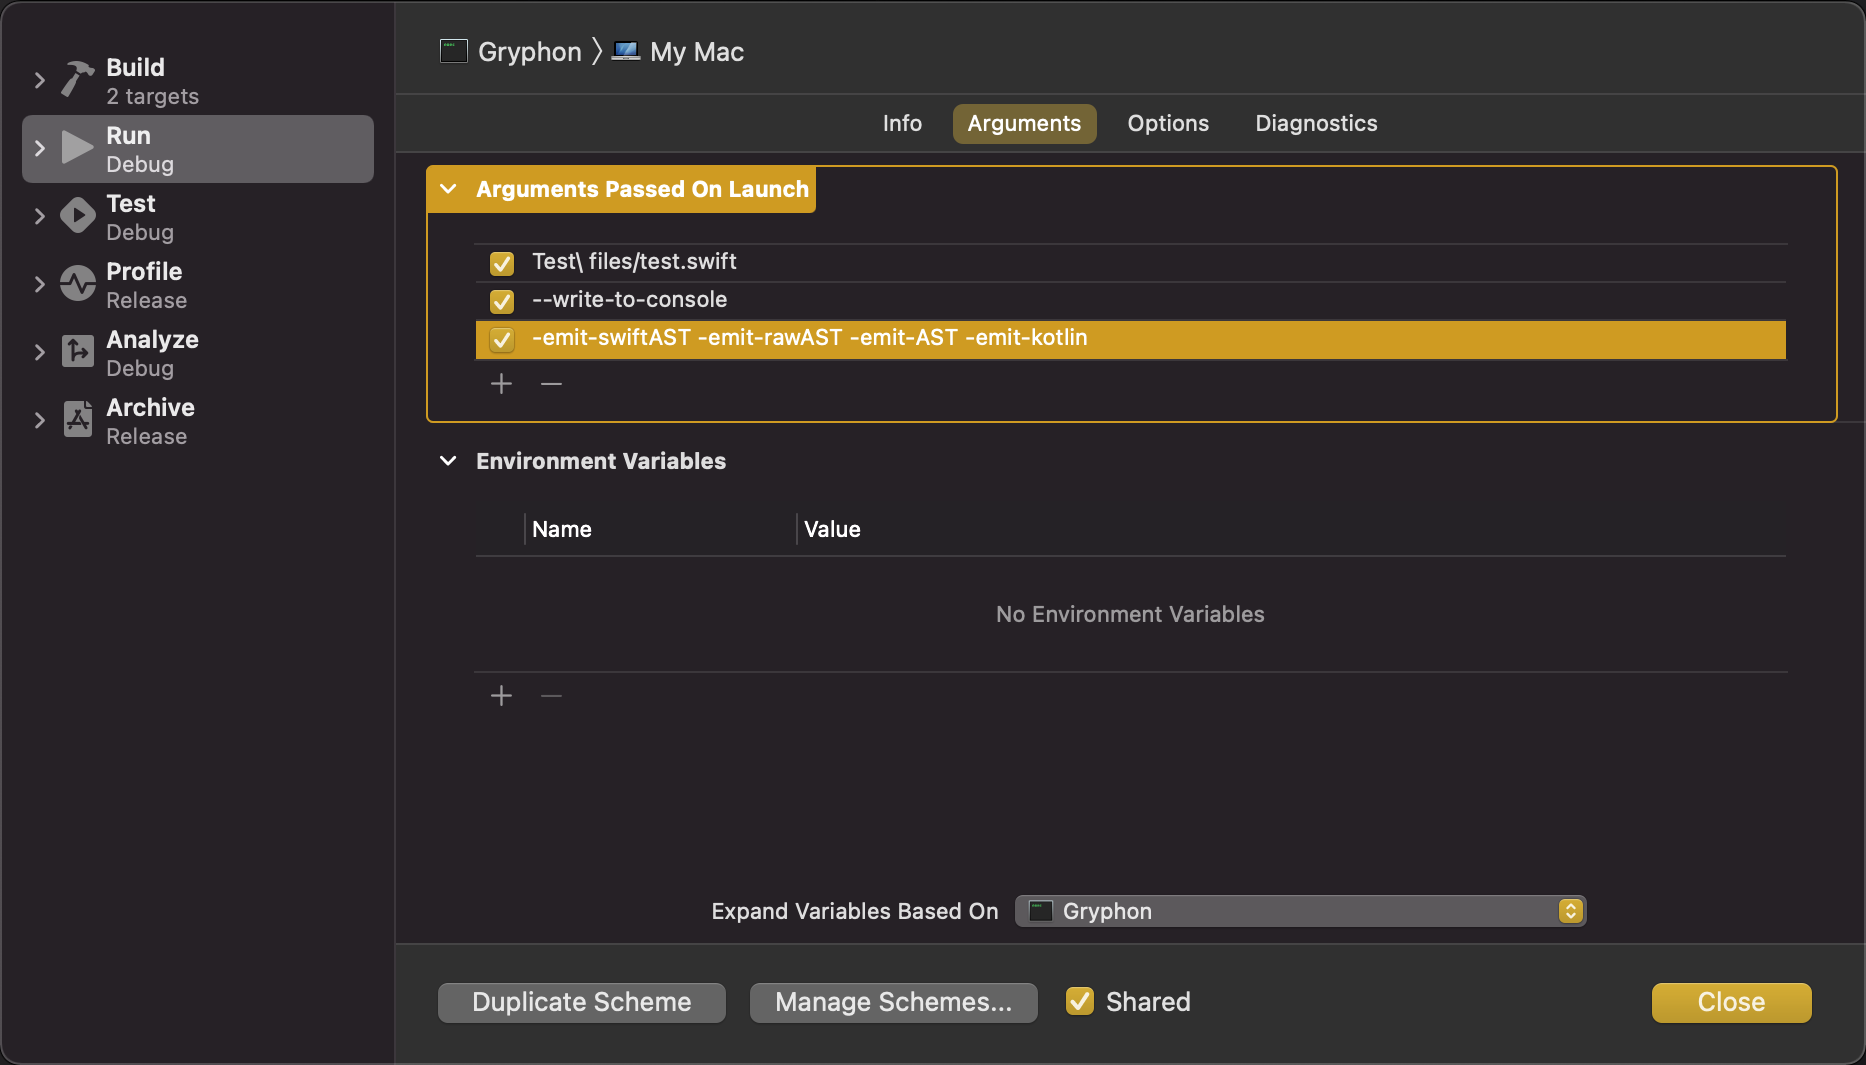
- Close the scheme editor.
These arguments will make Gryphon translate the Test files/test.swift file. You can open it on Xcode and change it however you want to. When you run the project with ⌘+R, you’ll see the translation show up in Xcode’s console, along with other intermediate ASTs (if you added the extra -emit arguments).
Setting up the environment on Linux and Docker
Since Linux and Docker don’t have access to Xcode, the setup is pretty much the same for both. Start by cloning the repository if you haven’t done it yet, either directly or through a fork you own (if you don’t know what a fork is, read one of the tutorials on making a pull request, like this one or this one). Remember to use the development branch if you want to change code and the gh-pages branch if you want to change the website.
$ git clone https://github.com/vinivendra/Gryphon.git --branch development
$ cd Gryphon
Gryphon is set up as a Swift package, so most commands can be called using the Swift package manager. To build the main executable, run:
$ swift build
Then execute it using:
$ ./.build/debug/Gryphon
A common invocation involves translating the test.swift file and printing its intermediate ASTs for debugging:
$ ./.build/debug/Gryphon Test\ files/test.swift --write-to-console -emit-swiftAST -emit-rawAST -emit-AST -emit-kotlin
Running the tests
The Gryphon project contains several test classes, with a few separations:
- Unit tests, which account for most of the test classes, are the ones that finish quickly and can be used often. (These aren’t really unit tests strictly speaking, that’s just what they’re called internally).
- Bootstrapping tests, which involve making Gryphon translate an older version of its own codebase, take a long time to set up and run - but also find a lot of bugs. Run these tests at least once before creating a pull request.
- Acceptance tests, responsible for compiling the translated code, running it, then comparing its output to an
.outputfile to make sure everything compiles and runs correctly. These tests also take a long time. You should run them at least once before creating a pull request, but only if you changed any Kotlin files in theTest files/Test casesfolder. - Xcode tests, which deal with Xcode and Android projects to make sure the Xcode integration works correctly.
- Performance tests, which measure how long Gryphon takes to translate Swift files all the way. Use these only if you’re trying to improve Gryphon’s performance: run them once before your changes to record the original times, then run them again after the changes to measure your improvements.
A usual development cycle can involve running unit tests often, then running the bootstrap and Xcode tests just before committing the changes. Acceptance and performance tests are rarely needed - only in the specific situations mentioned above.
The easiest way to run the test suite is with the test script:
$ ./Scripts/runTests.sh -u
This script sets up and runs the unit tests. You can add the -b flag if you want to include the bootstrapping tests, the -x flag for Xcode tests, and the -a flag for the acceptance tests:
$ ./Scripts/runTests.sh -u -a -b -x
Manual setup
The test script performs a lot of setup work, which can make testing a bit slower than it needs to be. It also doesn’t integrate with Xcode and lldb, which can be useful for debugging. Here’s how you can setup the environment to run the tests manually.
All automated tests require Gryphon to be initialized in the current folder. To do that, run:
$ swift build
$ ./.build/debug/Gryphon clean init -xcode
Include the -xcode flag even on Linux and Docker to ensure all the necessary files are being generated.
Setting up unit tests on macOS:
- On Xcode, hit ⌘+⇧+, to bring up the scheme editor:
- Select
Teston the left-hand side, thenInfoon the top; - Click the small triangle on the left of
GryphonLibTeststo open the test list; - Uncheck the
AcceptanceTestand thePerformanceTest(the remaining tests are the unit tests); - Click close, then hit ⌘+U to run the test suite. If you want to run one of the unchecked tests, hit ⌘+6, right-click the selected test, then click “Run”.
Setting up unit tests on Linux and Docker:
- Open the
Tests/GryphonLibTests/XCTestManifests.swiftfile; - Make sure the
AcceptanceTestis commented (thePerformanceTestnormally isn’t included in this file); - Run
swift teston the terminal to execute the unit test suite. If you want to run one of the other tests, uncomment it then run it with the--filteroption:$ swift test --filter Acceptance
Additional Docker tests
If you are using macOS, you might also want to run the tests in a Docker container to make sure they work on Linux. To do that, follow the instructions on setting up the Docker container, then run any appropriate tests using the either the Scripts/runTests.sh script or the “on Linux and Docker” instructions in this page.
Style
This project uses SwiftLint, a tool that automatically analyzes the code and sets it to the project’s style standards. SwiftLint can be installed using homebrew, or with other methods described in the project’s home page:
$ brew install swiftlint
It can be used from the command line to automatically format all Swift source files according to the project’s standard. Just run this command from the root directory of the repository:
$ swiftlint autocorrect
Alternatively, you can run this command automatically with Xcode by adding it as a new Run Script Phase.
How Gryphon works
This section gives a brief explanation on Gryphon’s architecture, in the hopes of making it easier for contributors to understand it and start making changes.
Gryphon is almost entirely implemented as a library, GryphonLib. The gryphon executable consists of a main.swift file that imports this library and redirects the command-line arguments to it, printing errors if there are any.
The entry point for GryphonLib is the Driver class. This class is responsible for parsing the arguments and calling other classes to do the actual compilation work.
The compilation is performed as a pipeline:
- First, the
SwiftSyntaxDecoderclass calls SwiftSyntax and SourceKit to parse the Swift files and turn them into aGryphonAST; - Then, the
TranspilationPassruns passes on it, turning it into a “processed” Kotlin-likeGryphonAST; - Finally, the
KotlinTranslatorwrites it into Kotlin code.
Each of these steps receives its input along with other relevant information, most of which is stored in a TranspilationContext. They mostly deal with ASTs, or Abstract Syntax Trees, a data structure that’s very useful for representing code.
Much of this process is done using files in the .gryphon folder. This folder is created whenever the user calls gryphon init <xcode project>. It is also created when calling gryphon <input files> directly, then deleted once the translation is done. It can be deleted manually with gryphon clean. This folder contains any auxiliary files that Gryphon might need. This includes the Swift templates used for translating references to the standard library, scripts for dealing with Xcode projects and for mapping Kotlin errors to Swift, and several others.
The AuxiliaryFileContents.swift file contains the contents of these files. It also contains the contents of the GryphonSwiftLibrary.swift and the GryphonKotlinLibrary.kt files that users add to their projects using gryphon generate-libraries. The contents of the library files should always match the strings in this file; there is a test in DriverTest that ensures this.
Most of the actual translation work happens in the several TranspilationPass classes. Each of these classes is responsible for performing a small part of the translation. There are many of them, as illustrated below, but they change often, so the image is probably already inaccurate.
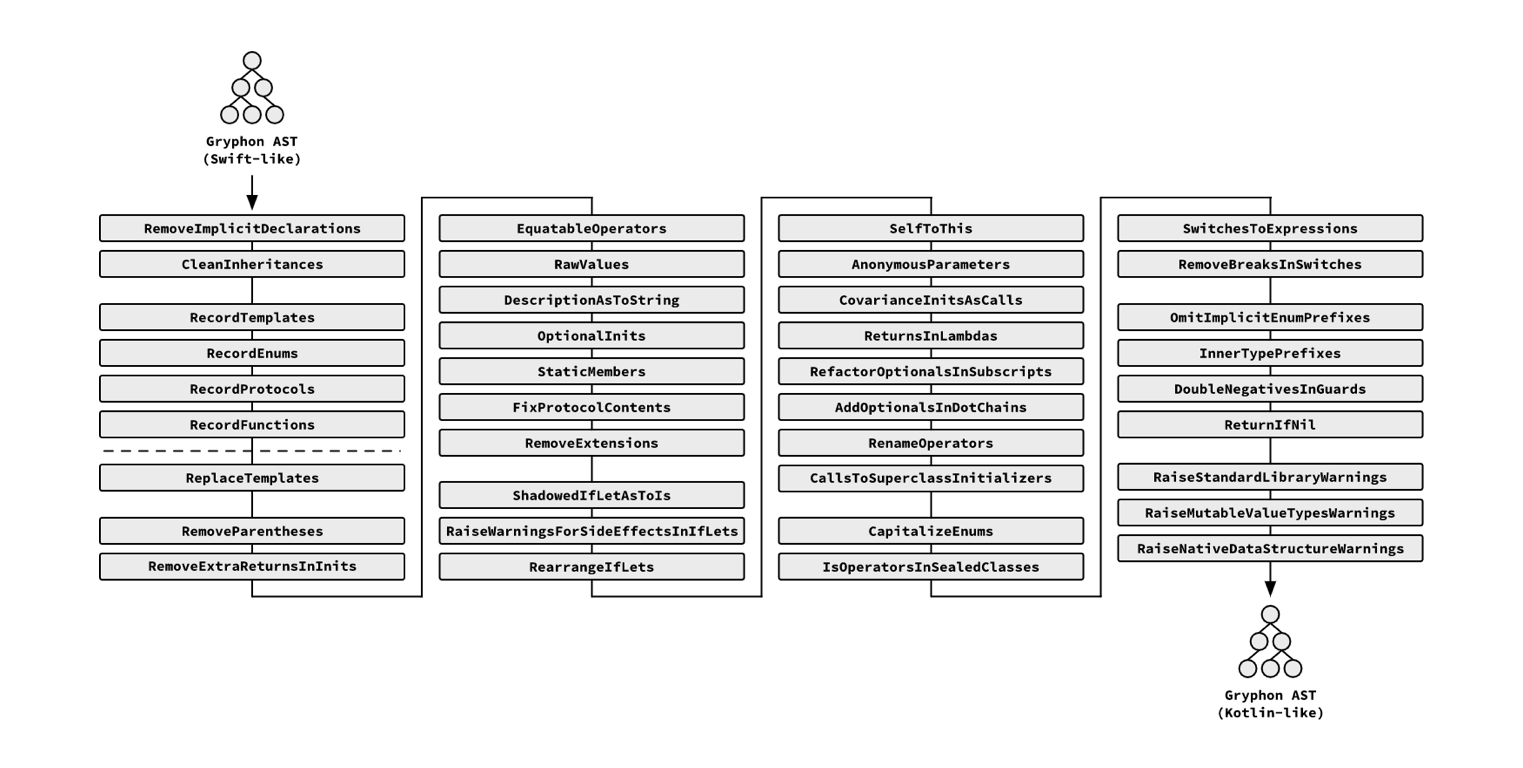
Most of Gryphon’s compilation is done in parallel for each input file. There is only one necessary point of synchronization, which is in the middle of the transpilation passes (specifically, the dotted line in the first column of the image above). This synchronization point is necessary because some transpilation passes need information from other files, which might not yet be available if the files are in threads that haven’t been processed yet. The first few transpilation passes are responsible for recording this information on the shared TranspilationContext class. Once that has been done for all files, then the other transpilation passes can continue to work in each file in parallel again.
The LibraryTranspilationPass.swift file contains transpilation passes responsible for recording and applying templates to the source files. These transpilation passes are larger than the others, so they’re placed in a separate file so they don’t clutter the main TranspilationPass file.
After all the transpilation passes have been executed, the resulting GryphonAST is handed to the KotlinTranslator class. This class turns the GryphonAST into a KotlinTranslationResult. A KotlinTranslationResult is a finished Kotlin translation - all the strings are there, in the order thay’ll be placed in the output file - but it still is structured as an AST. This allows the compiler to create error maps for each file before synthesizing the final code. Error maps are files that map each element in a Kotlin source file to the element in a Swift source file that originated it. Gryphon uses these maps to report Kotlin errors in their corresponding locations in the Swift source files.